

Introduction to Proxys.io
Proxys.io is a proxy service that provides high-quality, anonymous and clean proxies to solve all problems.
The service provides a wide range of GEOs and subnets:
- Statistical IPv4 - Russia, Netherlands, Ukraine, Germany, France, UK, USA, Brazil, India, Canada, Belarus, Kazakhstan.
- Shared static hosting IPv4 - Russia, Netherlands, Ukraine, France.
- Static resident IPv4 - Russia, Poland.
- Static IPv6 - Russia, USA.
- Dynamic IPv6 - Russia, USA.
Benefits:
Separate ports for HTTP (S) and SOCKS5 (randomly generated).
Authorization by IP (login and password by default)
Possibility to change ports if necessary.
24/7 support with an average response time of 30 seconds.
Affiliate program 20% with lifelong assignment of referrals.
API for developers.
Free test for 24 hours.
How to set up a Proxys.io proxy in AdsPower
1.Download and install AdsPower
2.Open the software and click “Single Import”
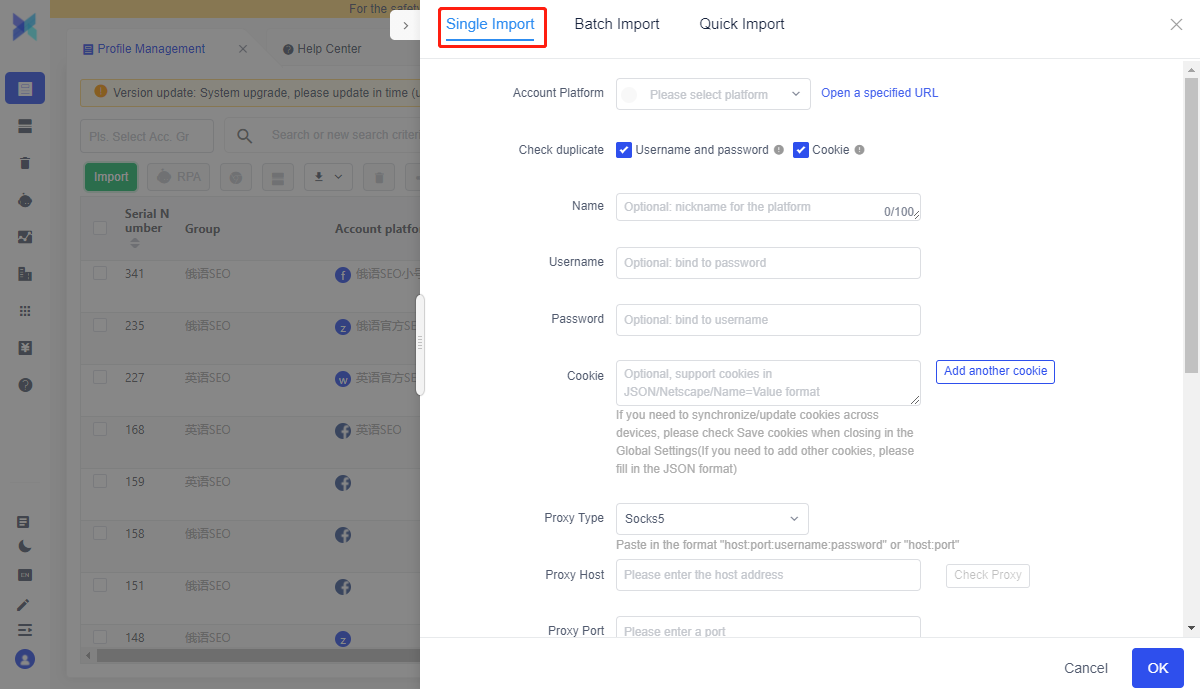
3.Setting up static proxies
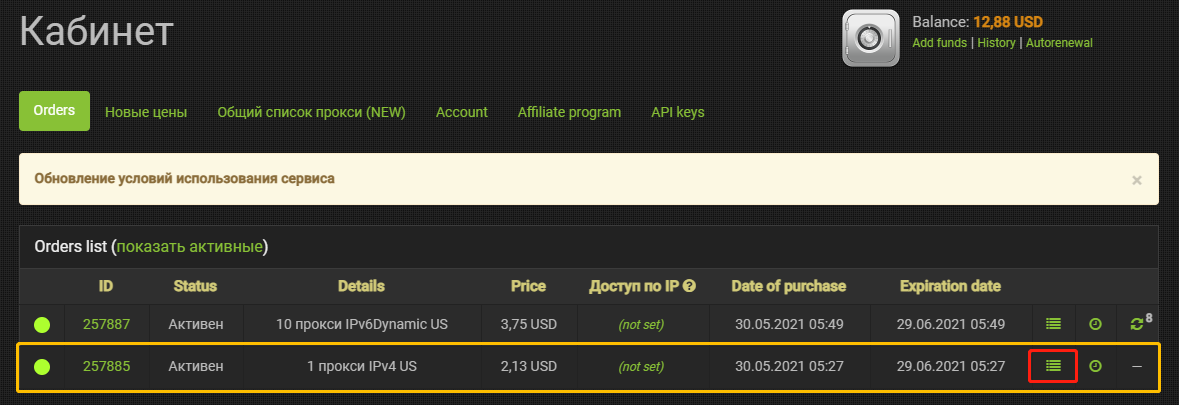
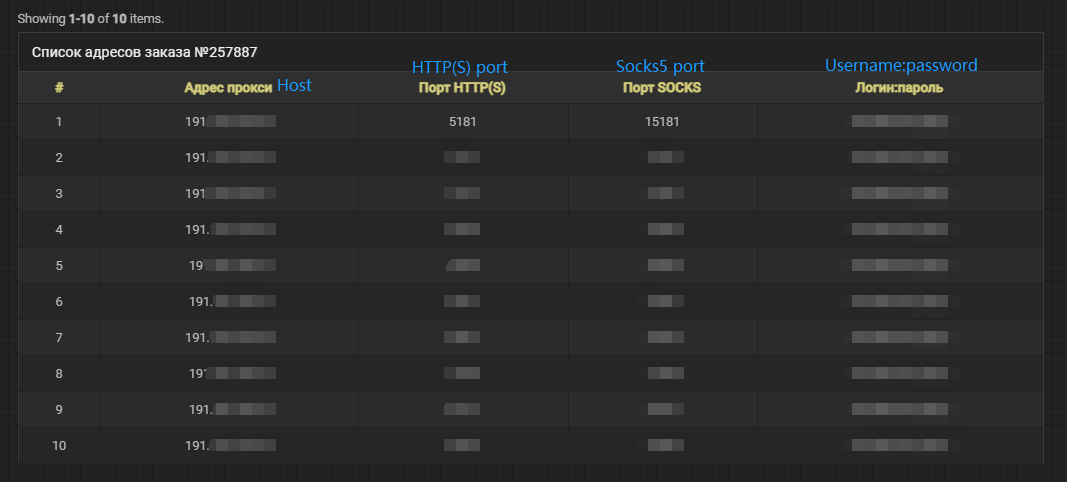
3.1 If you use a static proxy, you need to get the proxy information first. Proxys.io supports HTTP(S) and Socks5. The port of each protocol is different.
As shown below, for the IPv4 US proxy, the HTTP(S) port is 1052, while the Socks5 port is 11052.

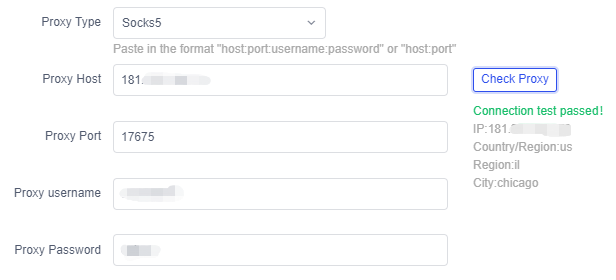
3.2 After setting up the proxy, check if the connection works

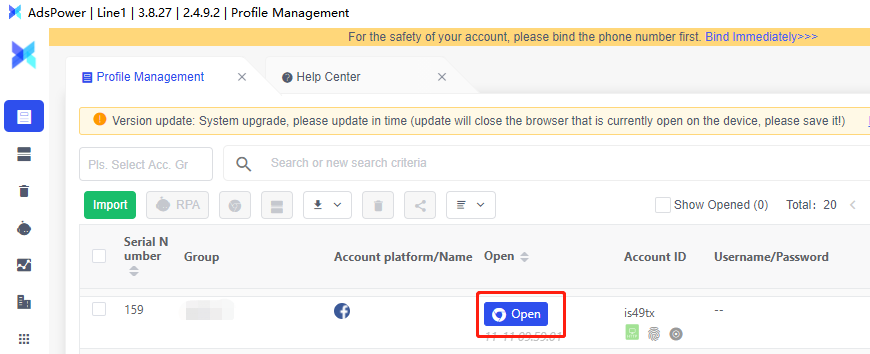
3.3 Click “Open” to open the browser profile
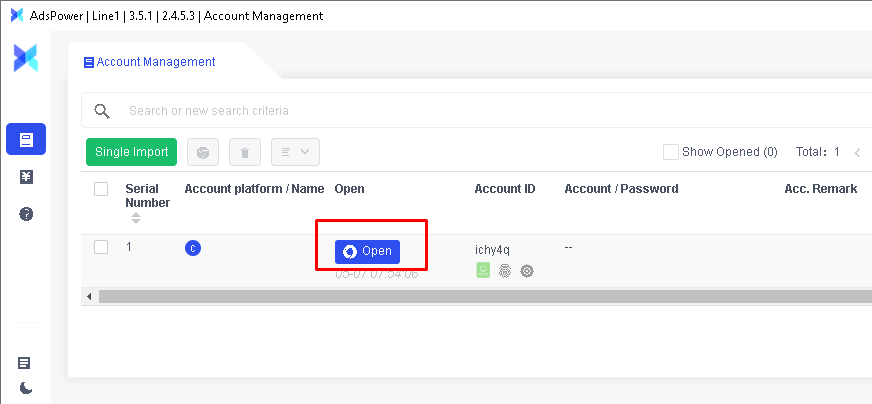
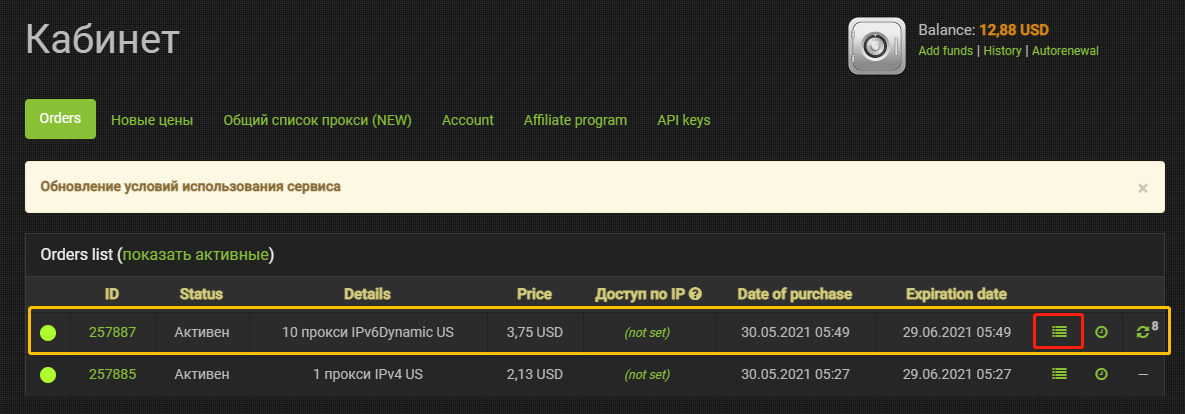
4.Setting up dynamic proxies
4.14.1 If you use a dynamic proxy, you need to get the proxy information first. Proxys.io supports HTTP(S) and Socks5. The port of each protocol is different.
As shown below, choose one of the ten purchased proxies and set it up in AdsPower.
4.2After setting up the proxy, check if the connection works
4.3Click “Open” to open the browser profile
Configuration of 911S5 Proxy in AdsPower
Setting up 911 S5 Client
1. Start the 911 S5 Client
2. Go to the "Program" tab
Add any program to the program list. Do not add AdsPower to the list - this may cause instability and crashes
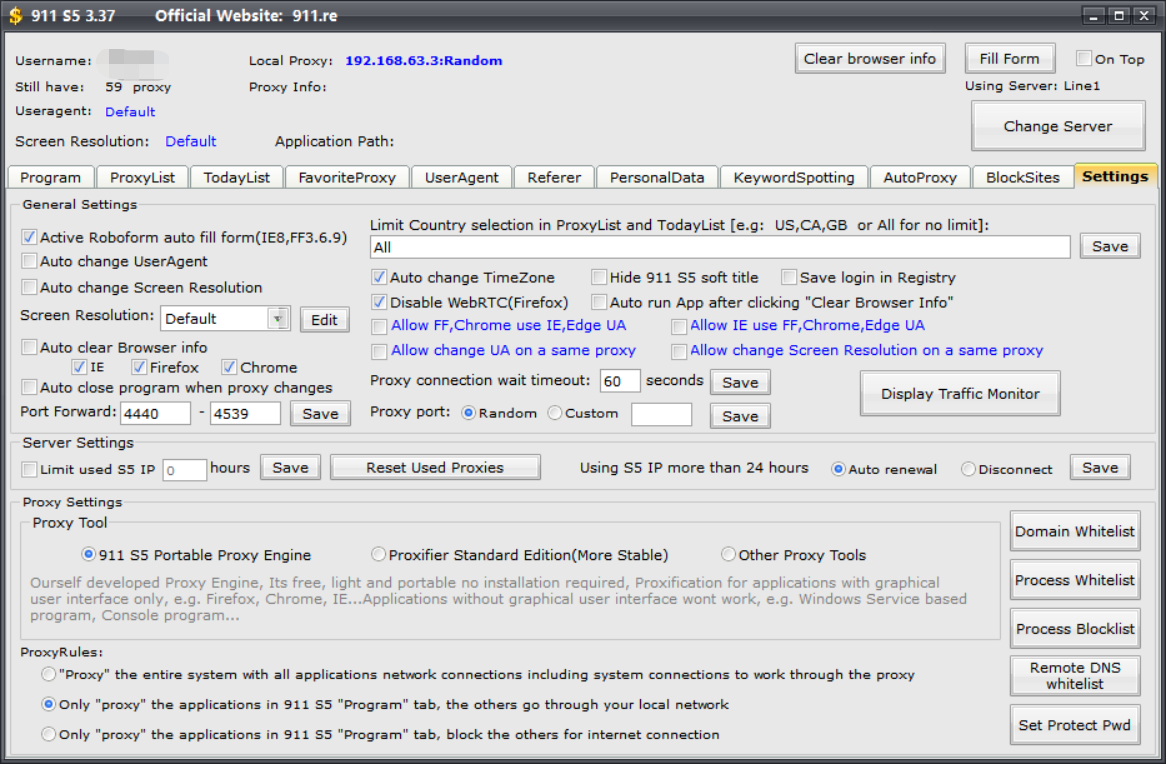
3. Go to the Settings tab:
Uncheck "Auto close program when proxy changes" and "Limit used S5 IP XX hours".
In the "Port Forward" field, set the port range to 4440 - 4539 and click Save
Set the "Proxy Port" field to "Random" and click Save
Set the "Using S5 IP for more than 24 hours" field to "Auto renewal" and click Save
Set the "911 S5 Portable Proxy Engine" value in the "Proxy Tool" field.
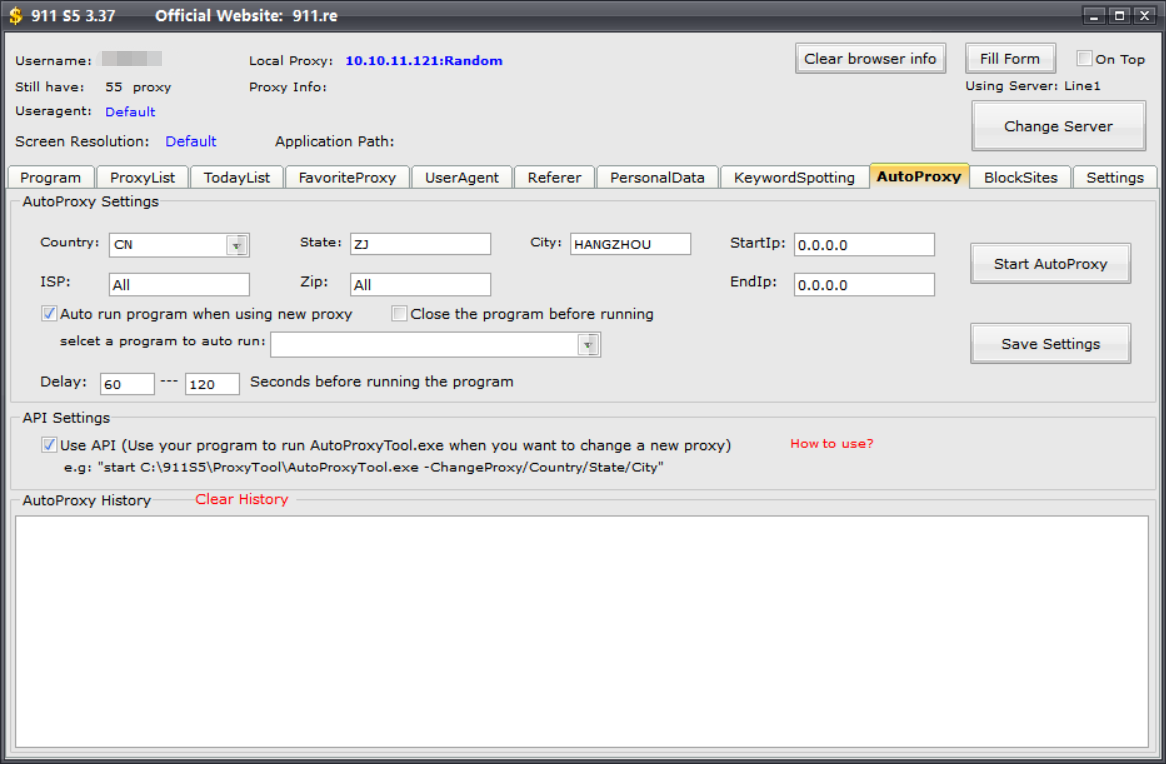
4.Go to the "Auto proxy" tab, in the "API Settings" field check the "Use API" checkbox
After configuring the 911 Client, you can move on to configure the 911 S5 proxy in AdsPower.
Create a single profile in AdsPower using a 911 S5 proxy
1. Launch the 911 Client and go to "Proxylist" tab
Select the appropriate proxies for you from the list and right-click
Select "Forward Port To Proxy" and assign any port from the range (e.g. 4440)
In the "PortForwardList" menu you'll see the proxies you've chosen and the port you've assigned.
2. Start AdsPower and go to the profile management panel
3. When creating a new profile, select "SOCKS5" in the proxy field from the drop-down list;
In the "Proxy Host" field enter the IP address displayed in the "Local Proxy" tab of the 911 Client
In the "Proxy port" field indicate any port from the range assigned earlier (for example, 4440).
Leave the fields "Proxy login" and "Proxy password" empty
4. Press "Test proxy".
5. Finish configuring the profile and click "OK".
911 S5 proxy settings in AdsPower for mass import of profiles
1. Launch the 911 Client and go to the "Proxylist" tab
Choose the proxies that suit you from the list and right-click
Select "Forward Port To Proxy" and assign any available port in the range to each (e.g. 4440 and 4441)
In the "PortForwardList" menu, you'll find the proxies you've selected and the port you've assigned.
2. Start AdsPower and go to your profile management panel
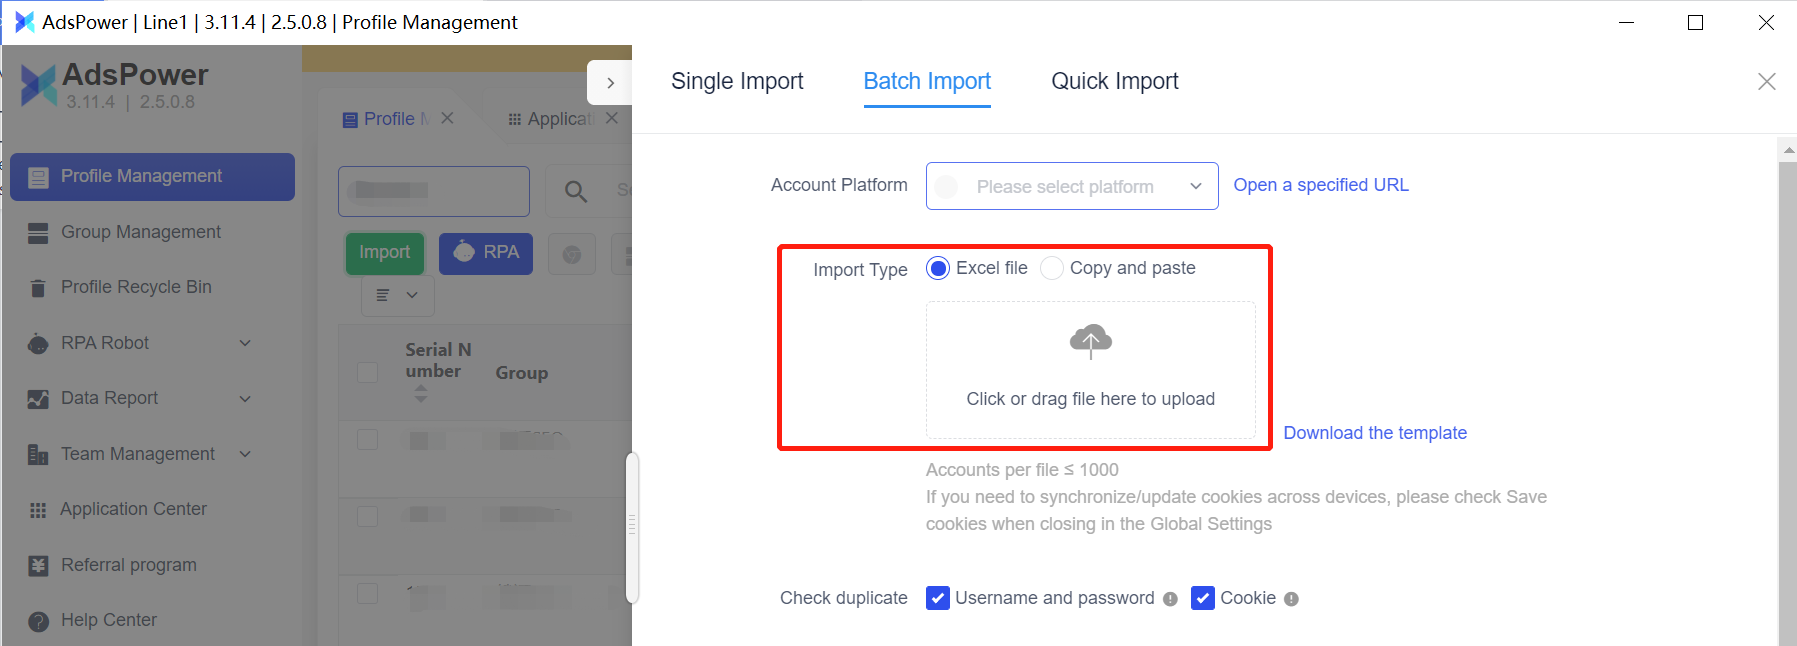
3. Go to the "Batch Import" tab
4. In the Import Method field, select "Excel File".
Create an Excel file on your device and write socks5 in the "proxytype" column; in the "proxy" column paste the copied values from the "PortForwardList"
5. In the Batch Import menu, specify the path or drag and drop the filled in Excel file to the import field
6. Finish configuring the profile and click "OK".
Configuration BrightData (Luminati) Proxy in AdsPower
Bright Data Proxy
AdsPower is used for e-commerce, SMM and social media account management in various GEOs.
The browser provides users with a secure and centralized management tool.
If you manage multiple accounts (at least more than one) -- this is the perfect tool for you.
The peculiarity of AdsPower is that the application has no global IP infrastructure or network.
Think about it: let's say you need to manage your social network accounts in Hong Kong, Singapore, London, Paris and New York. You have a management tool - AdsPower, but what about your "fingerprint" which should have the same geolocation as your social network accounts?
That's where Bright Data comes in -- its reliable proxies -- https(s), socks5, mobile and resident proxies -- provide all AdsPower users with country-specific, city-specific, ASN-specific IP addresses, and even targeting by mobile operator address pools.
Configuring AdsPower to work with Bright Data
1. Start AdsPower and go to the Profile Management panel
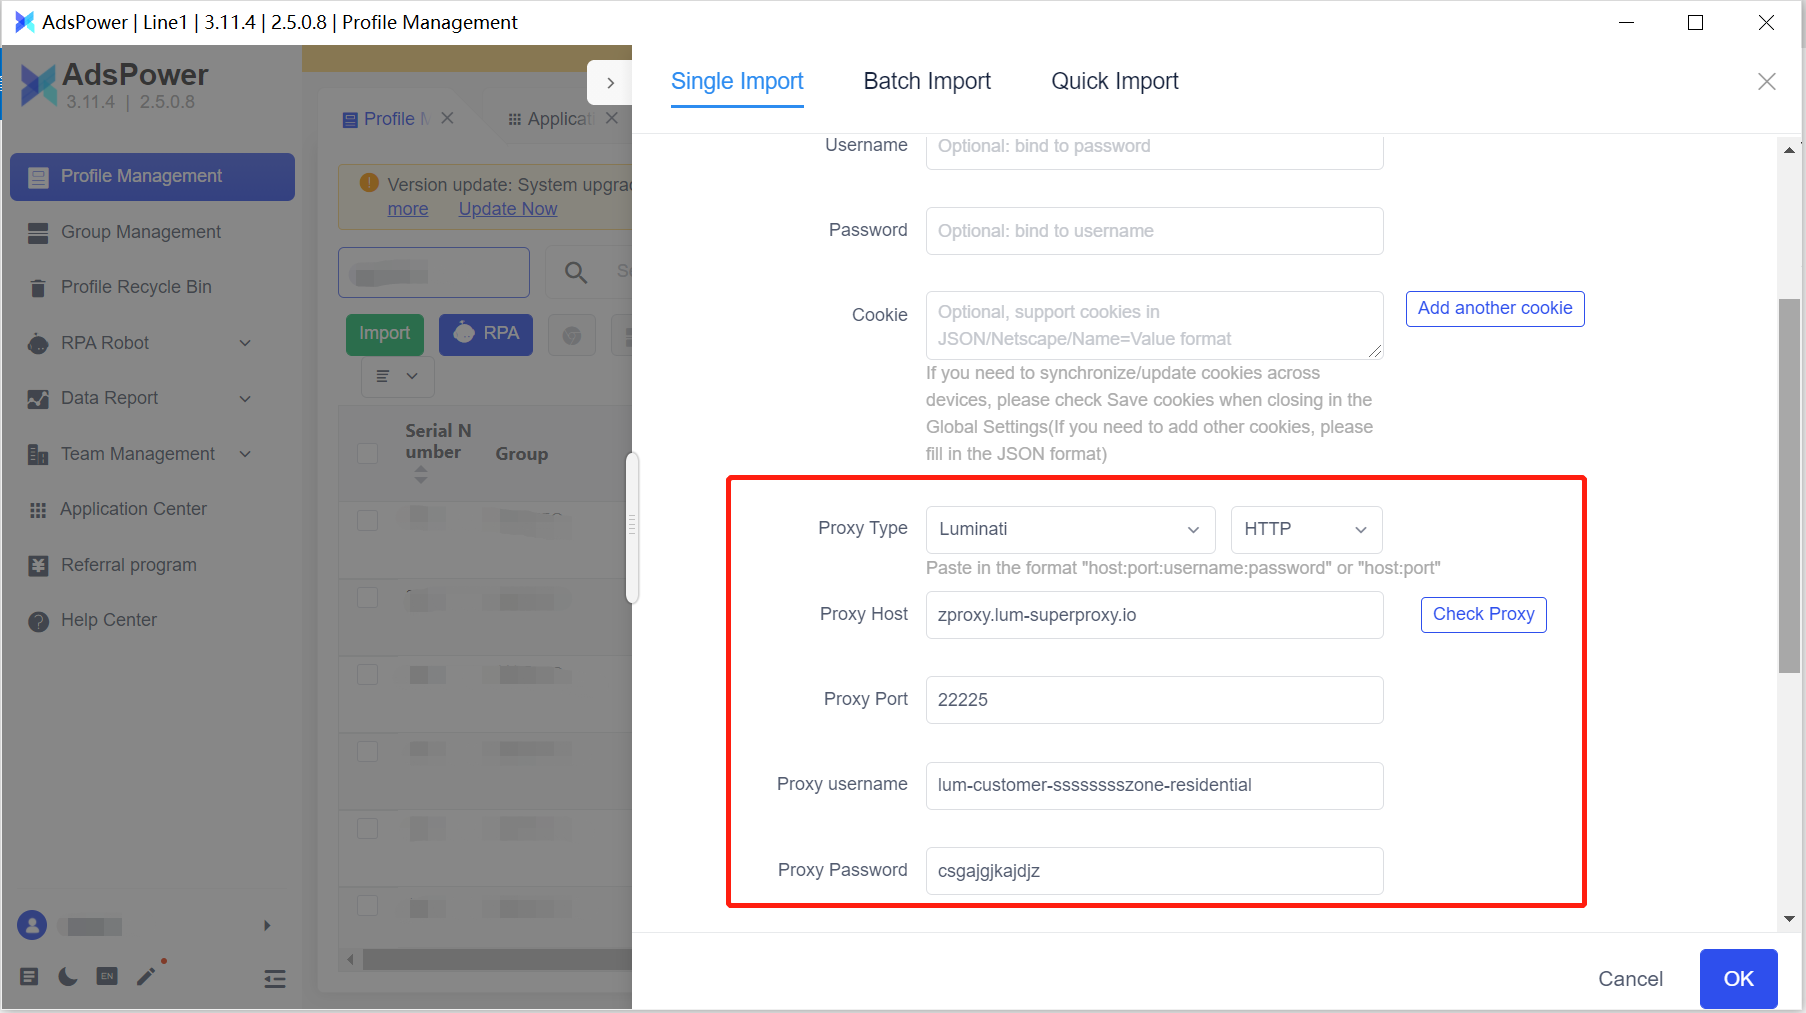
2. When creating a new profile, select "Luminati" in the proxy field from the drop-down list
3. Fill in the proxy information:
Proxy Host: zproxy.lum-superproxy.io
Proxy port: 22225
Proxy Login: your Zone username
Proxy password: your Zone password. 5.
4.Save your profile
Batch import profiles using Bright Data proxies in AdsPower
1. Login to your Bright Data account
2. Go to the Bright Data dashboard and click "Add zone"
3. Select the network type and click "Add Zone".
4. Go back to the Bright Data dashboard and click on the zone name
5. Go to Profile Management - Batch Import in AdsPower
6. Select “Excel file” as the import type.
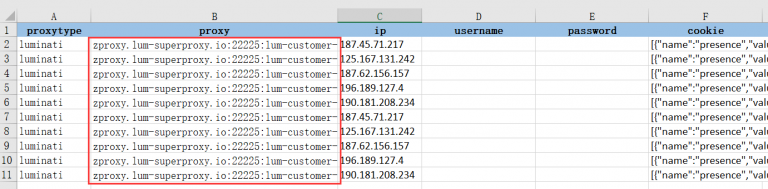
7. Create an Excel file on your device.
In the "proxytype" column type luminatihttps, luminatihttp or luminatisocks5 -- depending on which proxy protocol is used;
In the "proxy" column type zproxy.lum-superproxy.io:2225:proxy login:proxy password;
in the "IP" column, insert the corresponding IP addresses used to register the account; if you don't know the IP address, leave the field empty
8. Go to the Batch import menu
9. Specify the path or drag and drop the completed Excel file into the field to import
10. Finish setting up the profile and click "OK".
How to automatically select a Bright Data dynamic resident IP address in AdsPower
1. Go to the AdsPower profile management panel
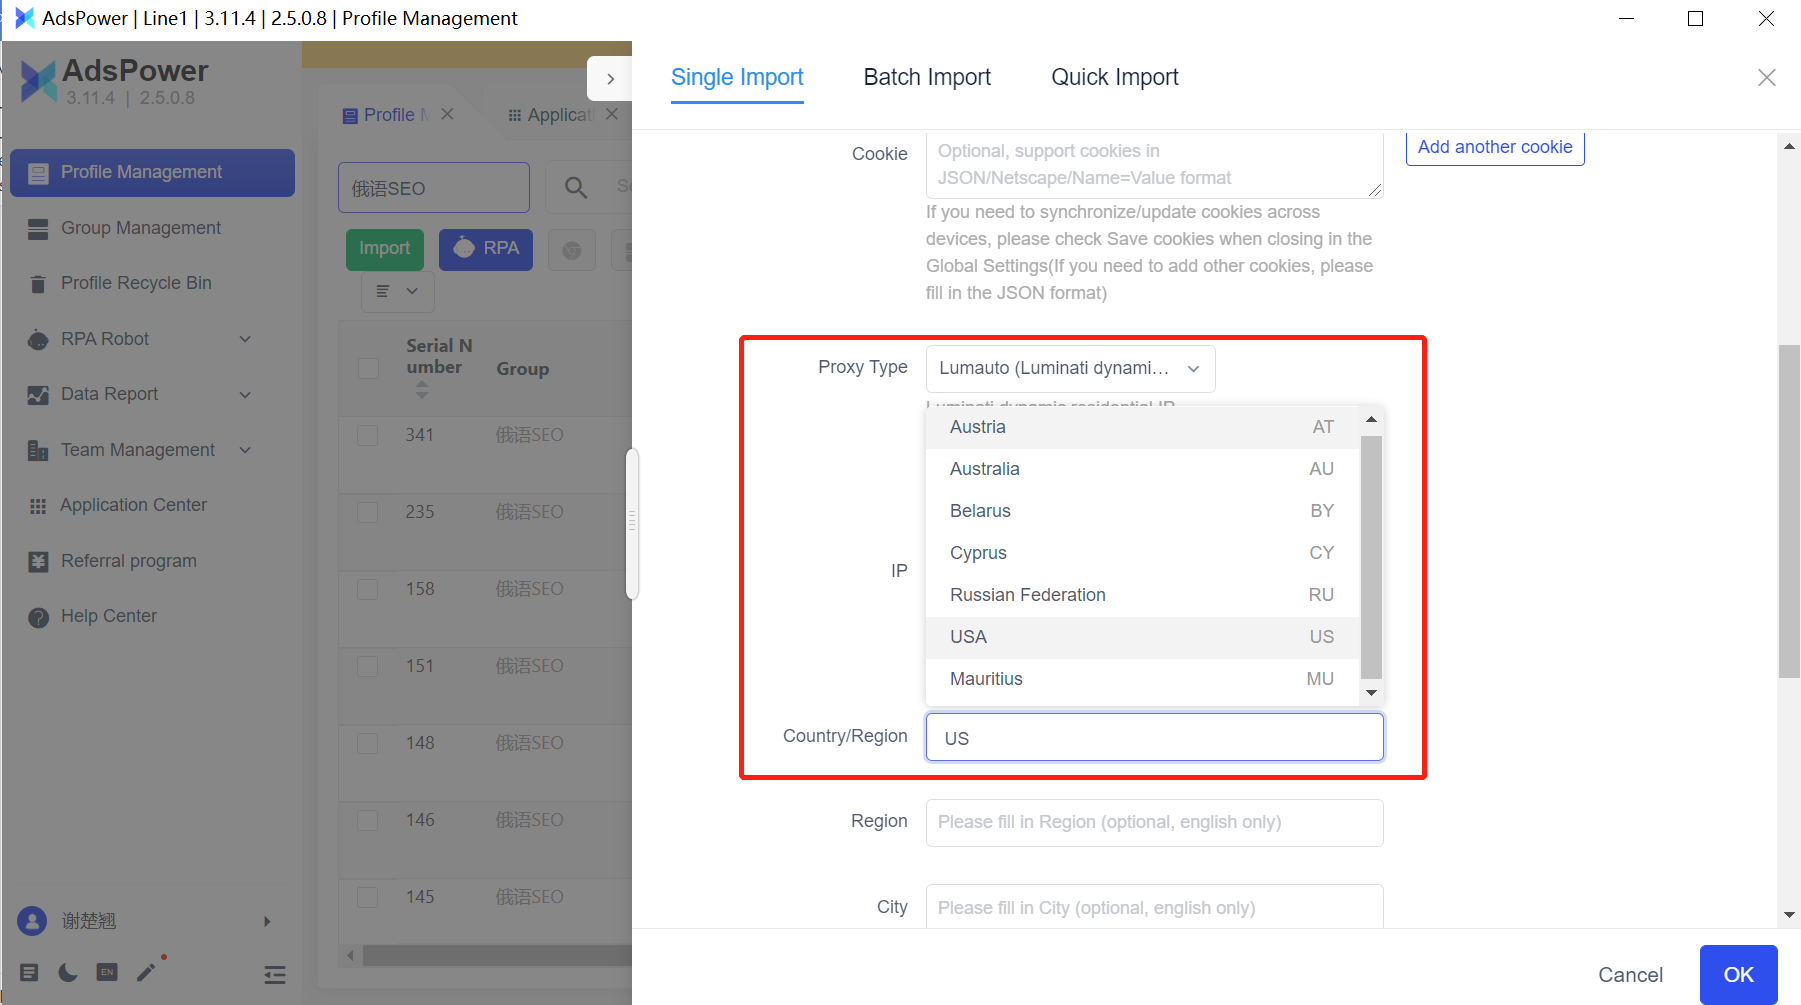
2. When creating a new profile, select "Lumauto" in the proxy field from the drop-down list
3. Enter the login/password for the Bright Data dynamic resident IP
4. Use the Country field (City/Region is optional) to match the proxy to your target GEO. Enter an international two-digit Latin code, such as US; or simply select the desired location from the drop-down list
5. Finish configuring the profile and press "OK".
Proxys.io is a proxy service that provides high-quality, anonymous and clean proxies to solve all problems.
The service provides a wide range of GEOs and subnets:
- Statistical IPv4 - Russia, Netherlands, Ukraine, Germany, France, UK, USA, Brazil, India, Canada, Belarus, Kazakhstan.
- Shared static hosting IPv4 - Russia, Netherlands, Ukraine, France.
- Static resident IPv4 - Russia, Poland.
- Static IPv6 - Russia, USA.
- Dynamic IPv6 - Russia, USA.
Benefits:
Separate ports for HTTP (S) and SOCKS5 (randomly generated).
Authorization by IP (login and password by default)
Possibility to change ports if necessary.
24/7 support with an average response time of 30 seconds.
Affiliate program 20% with lifelong assignment of referrals.
API for developers.
Free test for 24 hours.
How to set up a Proxys.io proxy in AdsPower
1.Download and install AdsPower
2.Open the software and click “Single Import”
3.Setting up static proxies
3.1 If you use a static proxy, you need to get the proxy information first. Proxys.io supports HTTP(S) and Socks5. The port of each protocol is different.
As shown below, for the IPv4 US proxy, the HTTP(S) port is 1052, while the Socks5 port is 11052.
3.2 After setting up the proxy, check if the connection works
3.3 Click “Open” to open the browser profile
4.Setting up dynamic proxies
4.14.1 If you use a dynamic proxy, you need to get the proxy information first. Proxys.io supports HTTP(S) and Socks5. The port of each protocol is different.
As shown below, choose one of the ten purchased proxies and set it up in AdsPower.
4.2After setting up the proxy, check if the connection works
4.3Click “Open” to open the browser profile
Post automatically merged:
Configuration of 911S5 Proxy in AdsPower
Setting up 911 S5 Client
1. Start the 911 S5 Client
2. Go to the "Program" tab
Add any program to the program list. Do not add AdsPower to the list - this may cause instability and crashes
3. Go to the Settings tab:
Uncheck "Auto close program when proxy changes" and "Limit used S5 IP XX hours".
In the "Port Forward" field, set the port range to 4440 - 4539 and click Save
Set the "Proxy Port" field to "Random" and click Save
Set the "Using S5 IP for more than 24 hours" field to "Auto renewal" and click Save
Set the "911 S5 Portable Proxy Engine" value in the "Proxy Tool" field.
4.Go to the "Auto proxy" tab, in the "API Settings" field check the "Use API" checkbox
After configuring the 911 Client, you can move on to configure the 911 S5 proxy in AdsPower.
Create a single profile in AdsPower using a 911 S5 proxy
1. Launch the 911 Client and go to "Proxylist" tab
Select the appropriate proxies for you from the list and right-click
Select "Forward Port To Proxy" and assign any port from the range (e.g. 4440)
In the "PortForwardList" menu you'll see the proxies you've chosen and the port you've assigned.
2. Start AdsPower and go to the profile management panel
3. When creating a new profile, select "SOCKS5" in the proxy field from the drop-down list;
In the "Proxy Host" field enter the IP address displayed in the "Local Proxy" tab of the 911 Client
In the "Proxy port" field indicate any port from the range assigned earlier (for example, 4440).
Leave the fields "Proxy login" and "Proxy password" empty
4. Press "Test proxy".
5. Finish configuring the profile and click "OK".
911 S5 proxy settings in AdsPower for mass import of profiles
1. Launch the 911 Client and go to the "Proxylist" tab
Choose the proxies that suit you from the list and right-click
Select "Forward Port To Proxy" and assign any available port in the range to each (e.g. 4440 and 4441)
In the "PortForwardList" menu, you'll find the proxies you've selected and the port you've assigned.
2. Start AdsPower and go to your profile management panel
3. Go to the "Batch Import" tab
4. In the Import Method field, select "Excel File".
Create an Excel file on your device and write socks5 in the "proxytype" column; in the "proxy" column paste the copied values from the "PortForwardList"
5. In the Batch Import menu, specify the path or drag and drop the filled in Excel file to the import field
6. Finish configuring the profile and click "OK".
Post automatically merged:
Configuration BrightData (Luminati) Proxy in AdsPower
Bright Data Proxy
AdsPower is used for e-commerce, SMM and social media account management in various GEOs.
The browser provides users with a secure and centralized management tool.
If you manage multiple accounts (at least more than one) -- this is the perfect tool for you.
The peculiarity of AdsPower is that the application has no global IP infrastructure or network.
Think about it: let's say you need to manage your social network accounts in Hong Kong, Singapore, London, Paris and New York. You have a management tool - AdsPower, but what about your "fingerprint" which should have the same geolocation as your social network accounts?
That's where Bright Data comes in -- its reliable proxies -- https(s), socks5, mobile and resident proxies -- provide all AdsPower users with country-specific, city-specific, ASN-specific IP addresses, and even targeting by mobile operator address pools.
Configuring AdsPower to work with Bright Data
1. Start AdsPower and go to the Profile Management panel
2. When creating a new profile, select "Luminati" in the proxy field from the drop-down list
3. Fill in the proxy information:
Proxy Host: zproxy.lum-superproxy.io
Proxy port: 22225
Proxy Login: your Zone username
Proxy password: your Zone password. 5.
4.Save your profile
Batch import profiles using Bright Data proxies in AdsPower
1. Login to your Bright Data account
2. Go to the Bright Data dashboard and click "Add zone"
3. Select the network type and click "Add Zone".
4. Go back to the Bright Data dashboard and click on the zone name
5. Go to Profile Management - Batch Import in AdsPower
6. Select “Excel file” as the import type.
7. Create an Excel file on your device.
In the "proxytype" column type luminatihttps, luminatihttp or luminatisocks5 -- depending on which proxy protocol is used;
In the "proxy" column type zproxy.lum-superproxy.io:2225:proxy login:proxy password;
in the "IP" column, insert the corresponding IP addresses used to register the account; if you don't know the IP address, leave the field empty
8. Go to the Batch import menu
9. Specify the path or drag and drop the completed Excel file into the field to import
10. Finish setting up the profile and click "OK".
How to automatically select a Bright Data dynamic resident IP address in AdsPower
1. Go to the AdsPower profile management panel
2. When creating a new profile, select "Lumauto" in the proxy field from the drop-down list
3. Enter the login/password for the Bright Data dynamic resident IP
4. Use the Country field (City/Region is optional) to match the proxy to your target GEO. Enter an international two-digit Latin code, such as US; or simply select the desired location from the drop-down list
5. Finish configuring the profile and press "OK".
Last edited: