


Tutorial from AllUWant4.com
I liked this Tutorial, so I'm sharing it :happy:
------------------
I messed around in Photoshop last night and made this.
I thought it looked nice, so if anyone wants to make one here's what you'll need to know:
1. Make a new image, 400 x 400 pixels, transparent background.
2. Once the image opens up, make a new layer, Shft+Ctrl+N, fill it black and put it on bottom.
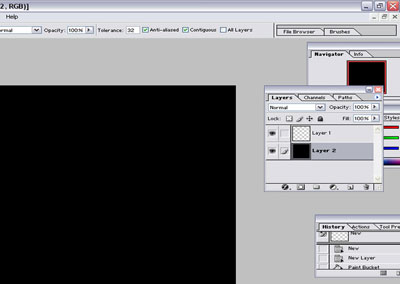
3. Click the layer that is blank. Then selct the Circle Marquee tool.

4. Hold down the SHIFT key and make a circle 3/4 the size of your canvas.
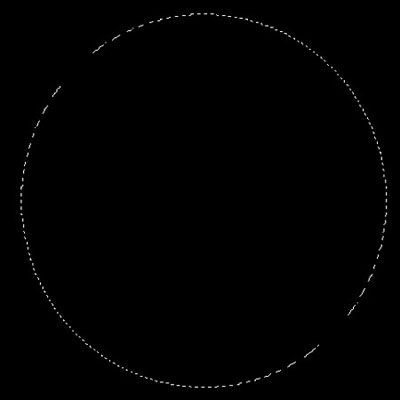
5. Keeping the Circle Marquee tool selected, click subtract from selection.
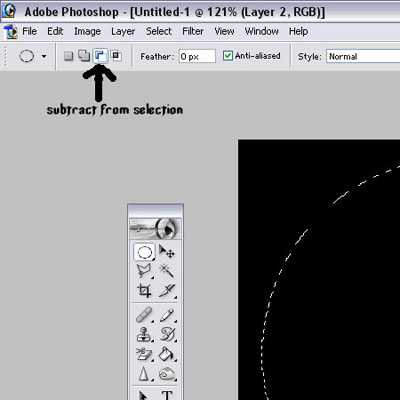
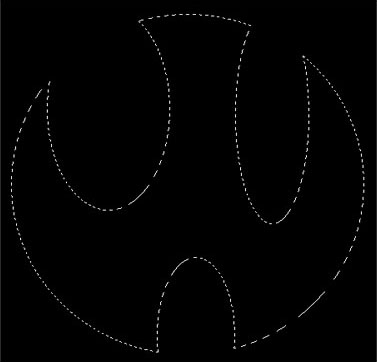
6. Then take a couple of circles out of the main circle using the circle marquee tool. It doesn’t matter if both sides are not symmetrical because we are only going to use one side of this.
7. Fill the selection you now have with any color, it doesn't matter. I'm going to use the color Green (Code is : 00C252 )
8. Click the rectangular marquee tool. You'll need to select the half that you do not want to use. This will keep the half you want to use selected *it sounds confusing, but trust me it works* its because we flip the good side and make it symmetrical.

9. Ctrl+C and then click new layer and then press Ctrl+V, Delete the layer with the whole pattern, (the one underneath the one you just made).
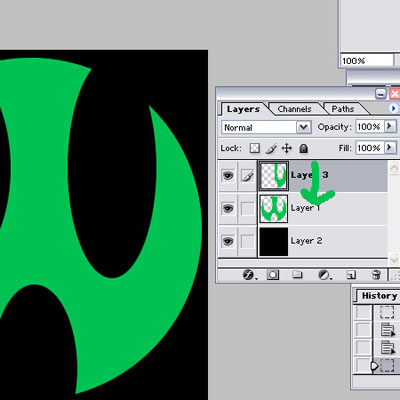
10. Duplicate the layer with half of your logo, Layer > Duplicate layer…. The go edit > Transform > Flip Horizontal and move it into place where it looks good.
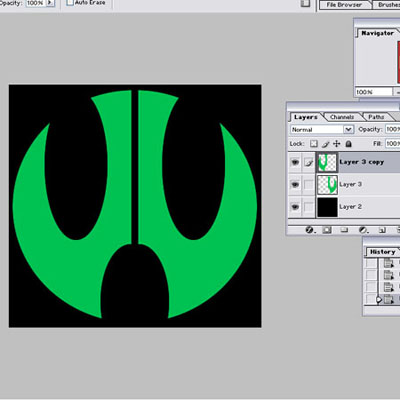
11. Press Ctrl+e why you have the top layer selected, then click layer > layer style > Blending Options. And apply these settings:
Outer Glow:
Blend mode- screen
opacity-75%
noise-0%
Elements-
technique-softer
spread-0
size-5
Quality-
range-50%
jitter-0%
Color I chose: 00C252
Inner glow:
Same applications as outer glow.
Color I chose: 00FF6C
Satin: Stick with regular settings
Gradient Overlay: stick with standard settings except color
I switched the ends for black and white so black was to the far right and white was at the far left *bottom bar only*
I chose the color: 00C252 to replace the white and I kept the black as the other color.
That's all you need to do.
You can merge the layers if you want to but other than that you're done.
This should be what your final product looks like *if you chose the colors that I chose*

I liked this Tutorial, so I'm sharing it :happy:
------------------
I messed around in Photoshop last night and made this.
I thought it looked nice, so if anyone wants to make one here's what you'll need to know:
1. Make a new image, 400 x 400 pixels, transparent background.
2. Once the image opens up, make a new layer, Shft+Ctrl+N, fill it black and put it on bottom.
Click to enlarge
3. Click the layer that is blank. Then selct the Circle Marquee tool.
4. Hold down the SHIFT key and make a circle 3/4 the size of your canvas.
5. Keeping the Circle Marquee tool selected, click subtract from selection.
6. Then take a couple of circles out of the main circle using the circle marquee tool. It doesn’t matter if both sides are not symmetrical because we are only going to use one side of this.
7. Fill the selection you now have with any color, it doesn't matter. I'm going to use the color Green (Code is : 00C252 )
8. Click the rectangular marquee tool. You'll need to select the half that you do not want to use. This will keep the half you want to use selected *it sounds confusing, but trust me it works* its because we flip the good side and make it symmetrical.
9. Ctrl+C and then click new layer and then press Ctrl+V, Delete the layer with the whole pattern, (the one underneath the one you just made).
10. Duplicate the layer with half of your logo, Layer > Duplicate layer…. The go edit > Transform > Flip Horizontal and move it into place where it looks good.
11. Press Ctrl+e why you have the top layer selected, then click layer > layer style > Blending Options. And apply these settings:
Outer Glow:
Blend mode- screen
opacity-75%
noise-0%
Elements-
technique-softer
spread-0
size-5
Quality-
range-50%
jitter-0%
Color I chose: 00C252
Inner glow:
Same applications as outer glow.
Color I chose: 00FF6C
Satin: Stick with regular settings
Gradient Overlay: stick with standard settings except color
I switched the ends for black and white so black was to the far right and white was at the far left *bottom bar only*
I chose the color: 00C252 to replace the white and I kept the black as the other color.
That's all you need to do.
You can merge the layers if you want to but other than that you're done.
This should be what your final product looks like *if you chose the colors that I chose*
") thx for sharing
thx for sharing